Mastering CI/CD: From Fundamentals to Azure DevOps Implementation with Python
The Evolution of Software Delivery: Understanding the DevOps Lifecycle
In today’s fast-paced software development landscape, the ability to deliver features quickly and reliably has become a competitive advantage. Companies like Ticketmaster have reduced their deployment times from 2 hours to just 8 minutes. This transformation is powered by CI/CD (Continuous Integration and Continuous Deployment) - a cornerstone practice in modern DevOps culture.
This article will take you from understanding the fundamental concepts of CI/CD to implementing a complete pipeline in Azure DevOps for a Python project. Whether you’re a developer looking to automate your workflow or a team lead aiming to improve your delivery process, this guide provides both theoretical understanding and practical implementation steps.

Before diving into CI/CD specifics, it’s essential to understand where it fits in the broader DevOps context. DevOps, a portmanteau of Development and IT Operations, represents a cultural shift in how software is built, deployed, and maintained.
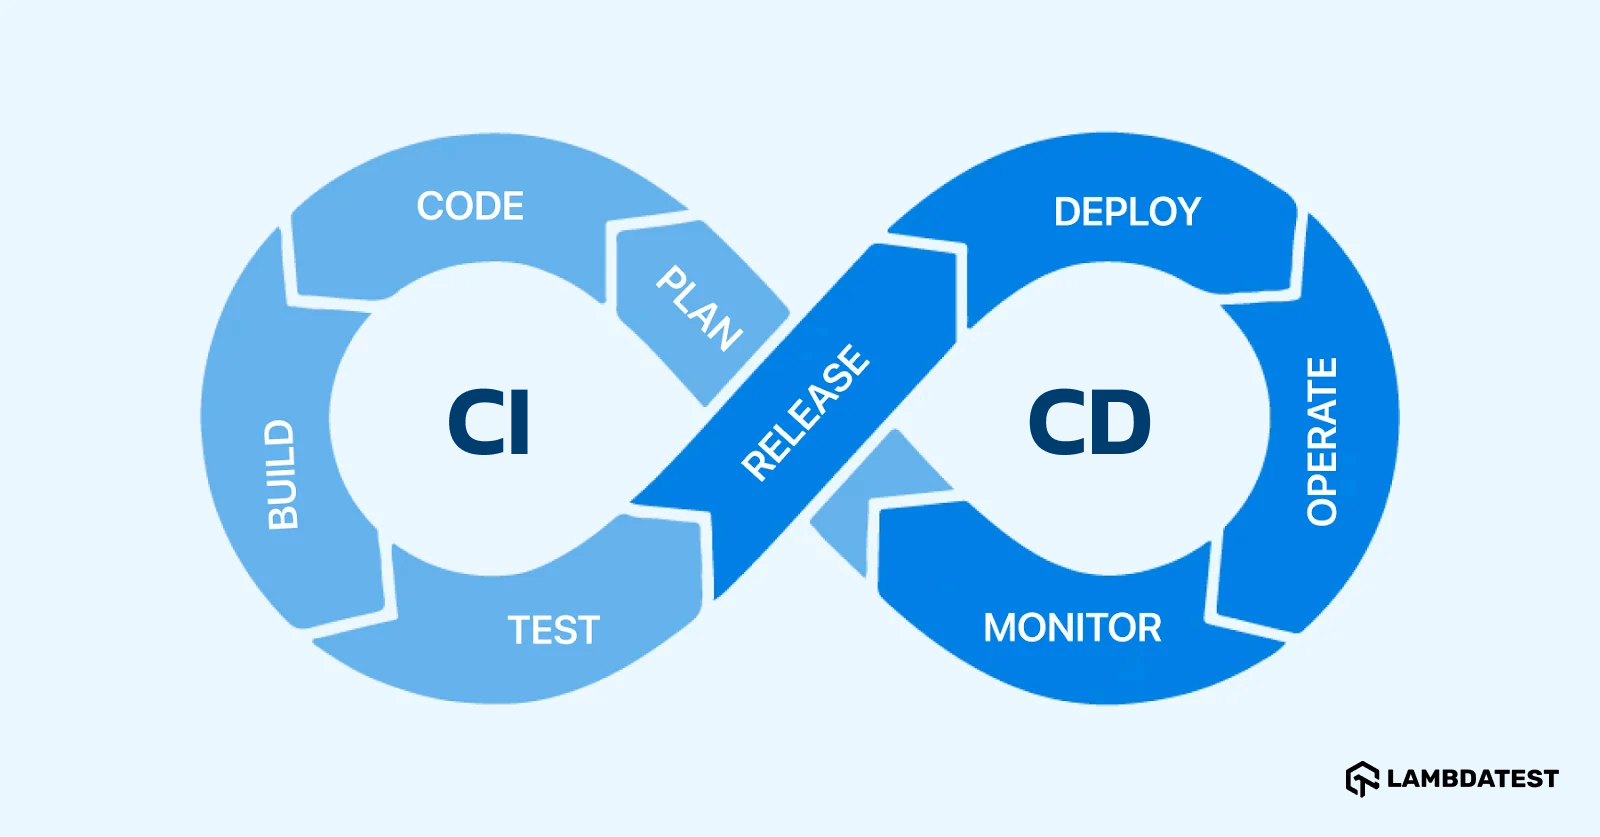
The DevOps lifecycle is often represented as an infinity loop (∞), symbolizing its continuous nature:
- Plan: Define requirements and plan improvements based on feedback
- Code: Developers write and version control the source code
- Build: Compile and package the application
- Test: Execute automated tests to ensure quality
- Deploy: Release to production environments
- Monitor: Track performance and collect metrics
- Feedback: Gather user feedback and system insights
This cycle repeats indefinitely, with each iteration improving upon the last.
What is CI/CD?
Continuous Integration (CI)
Continuous Integration is a development practice where developers frequently merge their code changes into a central repository. Each merge triggers an automated build and test sequence, allowing teams to detect problems early. Think of CI as a quality gate that ensures every piece of code meets your standards before it becomes part of the main codebase.
Key principles of CI:
- Frequent code commits (several times per day)
- Automated builds triggered by each commit
- Immediate feedback on code quality
- Early detection of integration issues
Continuous Deployment (CD)
Continuous Deployment takes CI a step further by automatically deploying code that passes all tests to production. This eliminates manual intervention in the release process, reducing the time between writing code and delivering value to users.
The Anatomy of a CI/CD Pipeline
A typical CI/CD pipeline consists of several stages, each serving a specific purpose in ensuring code quality and reliability:
1. Source Stage
- Code is pushed to a version control system (Git, GitHub, GitLab, Azure Repos)
- The push event triggers the pipeline
2. Build Stage
- Dependencies are installed
- Code is compiled (if applicable)
- Artifacts are created
3. Test Stage
Multiple types of automated tests run in parallel or sequence:
- Unit Testing: Tests individual functions or methods in isolation
- Integration Testing: Verifies that different components work together
- Validation Testing: Ensures the software meets business requirements
- Format Testing: Checks code style, linting, and syntax errors
4. Deploy Stage
- Application is deployed to staging or production
- Database migrations are executed
- Configuration updates are applied
5. Post-Deployment
- Smoke tests verify basic functionality
- Performance monitoring begins
- Rollback mechanisms stand ready
Benefits of Implementing CI/CD
The advantages of CI/CD extend beyond just faster deployments:
1. Reduced Time to Market
Automated pipelines can reduce deployment times from hours to minutes, allowing businesses to respond quickly to market demands and user feedback.
2. Improved Code Quality
Automated testing catches bugs early when they’re cheaper to fix, preventing technical debt from accumulating.
3. Enhanced Developer Productivity
Developers spend less time on manual testing and deployment, focusing instead on writing features that add value.
4. Lower Risk Deployments
Smaller, frequent releases are easier to debug and rollback if issues arise, compared to large, infrequent deployments.
5. Better Collaboration
CI/CD encourages better communication between development, operations, and business teams through shared visibility into the deployment process.
Setting Up a Python CI/CD Pipeline in Azure DevOps
Now, let’s implement a complete CI/CD pipeline for a Python application using Azure DevOps. This example will demonstrate testing, building, and deploying a Python web application.
Prerequisites
Before starting, ensure you have:
- An Azure DevOps account (free tier available)
- A Python project in a Git repository
- Basic familiarity with YAML syntax
- Azure subscription (for deployment targets)
Step 1: Project Structure
First, organize your Python project with a standard structure:
my-python-app/
├── src/
│   ├── __init__.py
│   ├── app.py
│   └── utils/
│       ├── __init__.py
│       └── helpers.py
├── tests/
│   ├── __init__.py
│   ├── test_app.py
│   └── test_helpers.py
├── requirements.txt
├── requirements-dev.txt
├── setup.py
├── .gitignore
├── README.md
└── azure-pipelines.yml
Step 2: Create Your Azure DevOps Project
- Navigate to dev.azure.com
- Create a new project
- Import your Git repository or connect to GitHub/GitLab
Step 3: Define the Pipeline Configuration
Create an azure-pipelines.yml file in your repository root:
# Azure DevOps Pipeline for Python Application
# This pipeline demonstrates CI/CD best practices for Python projects

trigger:
  branches:
    include:
      - main
      - develop
  paths:
    exclude:
      - README.md
      - docs/*

pool:
  vmImage: 'ubuntu-latest'

variables:
  pythonVersion: '3.9'
  buildConfiguration: 'Release'
  artifactName: 'python-app'

stages:
  # Stage 1: Build and Test
  - stage: BuildAndTest
    displayName: 'Build and Test'
    jobs:
      - job: TestJob
        displayName: 'Run Tests'
        steps:
          # Set up Python environment
          - task: UsePythonVersion@0
            inputs:
              versionSpec: '$(pythonVersion)'
            displayName: 'Use Python $(pythonVersion)'

          # Cache pip packages for faster builds
          - task: Cache@2
            inputs:
              key: 'python | "$(Agent.OS)" | requirements.txt'
              restoreKeys: |
                python | "$(Agent.OS)"
              path: $(PIP_CACHE_DIR)
            displayName: 'Cache pip packages'

          # Install dependencies
          - script: |
              python -m pip install --upgrade pip setuptools wheel
              pip install -r requirements.txt
              pip install -r requirements-dev.txt
            displayName: 'Install dependencies'

          # Run linting
          - script: |
              pip install flake8 black isort
              black --check src/
              isort --check-only src/
              flake8 src/ --max-line-length=88 --extend-ignore=E203
            displayName: 'Code quality checks'

          # Run unit tests with coverage
          - script: |
              pip install pytest pytest-cov pytest-azurepipelines
              pytest tests/ --cov=src --cov-report=xml --cov-report=html --junitxml=test-results.xml
            displayName: 'Run unit tests'

          # Publish test results
          - task: PublishTestResults@2
            condition: succeededOrFailed()
            inputs:
              testResultsFiles: '**/test-*.xml'
              testRunTitle: 'Python Tests'
            displayName: 'Publish test results'

          # Publish code coverage
          - task: PublishCodeCoverageResults@1
            inputs:
              codeCoverageTool: 'Cobertura'
              summaryFileLocation: '$(System.DefaultWorkingDirectory)/coverage.xml'
              reportDirectory: '$(System.DefaultWorkingDirectory)/htmlcov'
            displayName: 'Publish code coverage'

          # Security scanning
          - script: |
              pip install safety bandit
              safety check --json
              bandit -r src/ -f json -o bandit-report.json
            displayName: 'Security scanning'

          # Build artifacts
          - script: |
              python setup.py sdist bdist_wheel
            displayName: 'Build distribution packages'

          # Publish artifacts
          - task: PublishBuildArtifacts@1
            inputs:
              PathtoPublish: '$(System.DefaultWorkingDirectory)/dist'
              ArtifactName: '$(artifactName)'
            displayName: 'Publish artifacts'

  # Stage 2: Deploy to Staging
  - stage: DeployStaging
    displayName: 'Deploy to Staging'
    dependsOn: BuildAndTest
    condition: and(succeeded(), eq(variables['Build.SourceBranch'], 'refs/heads/develop'))
    jobs:
      - deployment: DeployToStaging
        displayName: 'Deploy to Staging Environment'
        environment: 'staging'
        strategy:
          runOnce:
            deploy:
              steps:
                - task: UsePythonVersion@0
                  inputs:
                    versionSpec: '$(pythonVersion)'
                  displayName: 'Use Python $(pythonVersion)'

                # Download artifacts
                - download: current
                  artifact: '$(artifactName)'

                # Deploy to Azure App Service (example)
                - task: AzureWebApp@1
                  inputs:
                    azureSubscription: 'Your-Azure-Subscription'
                    appType: 'webAppLinux'
                    appName: 'your-app-staging'
                    package: '$(Pipeline.Workspace)/$(artifactName)/*.whl'
                    runtimeStack: 'PYTHON|3.9'

                # Run smoke tests
                - script: |
                    pip install requests
                    python -m pytest tests/smoke/ --base-url=https://your-app-staging.azurewebsites.net
                  displayName: 'Run smoke tests'

  # Stage 3: Deploy to Production
  - stage: DeployProduction
    displayName: 'Deploy to Production'
    dependsOn: DeployStaging
    condition: and(succeeded(), eq(variables['Build.SourceBranch'], 'refs/heads/main'))
    jobs:
      - deployment: DeployToProduction
        displayName: 'Deploy to Production Environment'
        environment: 'production'
        strategy:
          runOnce:
            preDeploy:
              steps:
                - script: echo "Pre-deployment validation"
                  displayName: 'Pre-deployment checks'

            deploy:
              steps:
                - task: UsePythonVersion@0
                  inputs:
                    versionSpec: '$(pythonVersion)'
                  displayName: 'Use Python $(pythonVersion)'

                - download: current
                  artifact: '$(artifactName)'

                # Blue-Green deployment example
                - task: AzureWebApp@1
                  inputs:
                    azureSubscription: 'Your-Azure-Subscription'
                    appType: 'webAppLinux'
                    appName: 'your-app-production'
                    package: '$(Pipeline.Workspace)/$(artifactName)/*.whl'
                    runtimeStack: 'PYTHON|3.9'
                    deployToSlotOrASE: true
                    slotName: 'staging'

                # Validate deployment
                - script: |
                    pip install requests
                    python -m pytest tests/smoke/ --base-url=https://your-app-production-staging.azurewebsites.net
                  displayName: 'Validate staging slot'

                # Swap slots for zero-downtime deployment
                - task: AzureAppServiceManage@0
                  inputs:
                    azureSubscription: 'Your-Azure-Subscription'
                    appType: 'webAppLinux'
                    appName: 'your-app-production'
                    action: 'Swap Slots'
                    sourceSlot: 'staging'
                    targetSlot: 'production'

            postRouteTraffic:
              steps:
                - script: |
                    echo "Monitor application metrics"
                    # Add monitoring/alerting logic here
                  displayName: 'Post-deployment monitoring'

            on:
              failure:
                steps:
                  - script: echo "Deployment failed, initiating rollback"
                    displayName: 'Rollback on failure'
Step 4: Configure Pipeline Variables and Secrets
- In Azure DevOps, navigate to Pipelines → Library
- Create a variable group for sensitive data:
# Variable Group: python-app-secrets
- AZURE_SUBSCRIPTION_ID: <your-subscription-id>
- DATABASE_CONNECTION_STRING: <encrypted-connection-string>
- API_KEY: <encrypted-api-key>
- Link the variable group to your pipeline
Step 5: Set Up Environments and Approvals
- Navigate to Pipelines → Environments
- Create ‘staging’ and ‘production’ environments
- Add approval gates for production deployments:
- Required reviewers
- Business hours restrictions
- Automated quality gates
Step 6: Implement Git Workflow
Configure branch policies in Azure Repos:
# Clone repository
git clone https://dev.azure.com/your-org/your-project/_git/your-repo
cd your-repo

# Create feature branch
git checkout -b feature/new-feature

# Make changes and commit
git add .
git commit -m "Add new feature"

# Push to trigger CI pipeline
git push origin feature/new-feature

# Create Pull Request via Azure DevOps UI
# This triggers PR validation pipeline

# After approval and merge to develop
# Staging deployment is triggered automatically

# After testing in staging, merge to main
git checkout main
git merge develop
git push origin main
# Production deployment is triggered (with approvals)
Step 7: Monitor and Optimize
Set up monitoring and alerts:
- Application Insights for performance monitoring
- Azure Monitor for infrastructure metrics
- Pipeline Analytics for build/deployment metrics
# Example: Custom deployment validation script
import requests
import time
from azure.monitor import MetricsQueryClient
from azure.identity import DefaultAzureCredential

def validate_deployment(app_url, expected_version):
    """
    Validate that deployment was successful
    """
    max_retries = 5
    retry_delay = 10

    for attempt in range(max_retries):
        try:
            response = requests.get(f"{app_url}/health")
            if response.status_code == 200:
                data = response.json()
                if data.get('version') == expected_version:
                    print(f"✓ Deployment successful: {expected_version}")
                    return True

            print(f"Attempt {attempt + 1}/{max_retries} failed")
            time.sleep(retry_delay)

        except Exception as e:
            print(f"Error: {e}")
            time.sleep(retry_delay)

    return False

def check_metrics(resource_id):
    """
    Check application metrics post-deployment
    """
    credential = DefaultAzureCredential()
    client = MetricsQueryClient(credential)

    # Query response time metrics
    metrics = client.query_resource(
        resource_id,
        metric_names=["ResponseTime", "Requests"],
        timespan="PT5M"
    )

    for metric in metrics.metrics:
        print(f"{metric.name}: {metric.timeseries[0].data[-1].average}")

    return True

if __name__ == "__main__":
    app_url = "https://your-app.azurewebsites.net"
    version = "1.2.3"

    if validate_deployment(app_url, version):
        print("Deployment validation passed")
        # Continue with metric checks
        resource_id = "/subscriptions/.../resourceGroups/.../providers/Microsoft.Web/sites/your-app"
        check_metrics(resource_id)
    else:
        print("Deployment validation failed")
        exit(1)
[Suggested Image: Dashboard showing pipeline metrics and success rates]
Best Practices for CI/CD Success
1. Version Everything
- Use semantic versioning (e.g., 1.2.3)
- Tag releases in Git
- Version your pipeline configurations
2. Fail Fast, Fix Fast
- Run fastest tests first
- Parallelize where possible
- Provide clear error messages
3. Security First
- Scan for vulnerabilities regularly
- Never commit secrets to repositories
- Use managed identities where possible
4. Progressive Deployment
- Deploy to staging first
- Use feature flags for gradual rollouts
- Implement canary deployments for critical changes
5. Comprehensive Testing Strategy
# Example test structure
tests/
├── unit/           # Fast, isolated tests
├── integration/    # Component interaction tests
├── smoke/         # Basic functionality checks
├── performance/   # Load and stress tests
└── e2e/          # End-to-end user scenarios
6. Documentation as Code
- Document pipeline configurations
- Maintain runbooks for incident response
- Keep README files updated
Common Pitfalls and Solutions
Pitfall 1: Flaky Tests
Solution: Implement retry logic and investigate root causes
# pytest.ini configuration
[pytest]
addopts = --reruns 2 --reruns-delay 1
Pitfall 2: Long Build Times
Solution: Implement caching and parallel execution
# Parallel job execution
jobs:
  - job: TestPython38
    pool:
      vmImage: 'ubuntu-latest'
    steps:
      - script: echo "Testing Python 3.8"

  - job: TestPython39
    pool:
      vmImage: 'ubuntu-latest'
    steps:
      - script: echo "Testing Python 3.9"
Pitfall 3: Environment Drift
Solution: Use Infrastructure as Code (IaC)
# terraform/main.tf
resource "azurerm_app_service" "main" {
  name                = "${var.app_name}-${var.environment}"
  location            = var.location
  resource_group_name = var.resource_group_name
  app_service_plan_id = var.app_service_plan_id

  site_config {
    linux_fx_version = "PYTHON|3.9"
    always_on        = var.environment == "production" ? true : false
  }
}
Measuring CI/CD Success
Key metrics to track:
- Lead Time: Time from code commit to production
- Deployment Frequency: How often you deploy
- Mean Time to Recovery (MTTR): Time to fix production issues
- Change Failure Rate: Percentage of deployments causing failures
# Example metrics collection
import datetime
from azure.devops.connection import Connection
from msrest.authentication import BasicAuthentication

def calculate_lead_time(organization_url, pat):
    """Calculate average lead time for last 30 days"""
    credentials = BasicAuthentication('', pat)
    connection = Connection(base_url=organization_url, creds=credentials)

    # Get build client
    build_client = connection.clients.get_build_client()

    # Query builds from last 30 days
    min_time = datetime.datetime.now() - datetime.timedelta(days=30)
    builds = build_client.get_builds(
        project="YourProject",
        min_time=min_time,
        result_filter="succeeded"
    )

    lead_times = []
    for build in builds:
        commit_time = build.source_version_timestamp
        deploy_time = build.finish_time
        lead_time = (deploy_time - commit_time).total_seconds() / 3600
        lead_times.append(lead_time)

    avg_lead_time = sum(lead_times) / len(lead_times)
    print(f"Average lead time: {avg_lead_time:.2f} hours")

    return avg_lead_time
Conclusion
CI/CD is not just a technical practice—it’s a fundamental shift in how we deliver software. By automating the build, test, and deployment process, teams can focus on what matters most: creating value for users. The journey from manual deployments to a fully automated pipeline requires investment in tools, processes, and culture, but the returns in terms of quality, speed, and developer satisfaction are substantial.
Starting with the Azure DevOps implementation provided in this guide, you can begin transforming your development workflow today. Remember, CI/CD is an iterative process—start small, measure everything, and continuously improve. As you mature your pipeline, you’ll discover that what once seemed like a complex orchestration becomes second nature, enabling your team to deliver with confidence and velocity.
The future of software delivery is automated, intelligent, and continuous. By mastering CI/CD, you’re not just improving your current workflow—you’re preparing for a future where deployment friction is virtually eliminated, and the focus shifts entirely to innovation and user value.
Additional Resources
- Azure DevOps Documentation
- Python Testing Best Practices
- The DevOps Handbook
- Continuous Delivery: Reliable Software Releases
Reference
This article is based on content from the “Intro to CI/CD” video tutorial by Linode. The original video provides an excellent visual introduction to CI/CD concepts and can be viewed for additional context and visual demonstrations of the concepts discussed in this article.
Video Source: “Intro to CI/CD” - Linode YouTube Channel
Topics Covered: CI/CD fundamentals, DevOps lifecycle, pipeline workflows, and implementation benefits